http://www.codeproject.com/Articles/734536/Pros-and-Cons-of-HTML-Cross-Platform-Android-Mobi
http://www.codeproject.com/Articles/734099/Creating-cool-animations-and-transitions-in-HTML
posted under open source

Pros and Cons of HTML5 Cross-Platform Android* Mobile App Development Tools on Intel® Processor-based Devices
By , 4 Mar 2014
Editorial Note
This article is in the Product Showcase section for our sponsors at CodeProject. These reviews are intended to provide you with information on products and services that we consider useful and of value to developers.
The success of mobile applications depends on reaching target customers regardless of the device they use. And cross-platform mobile application development tools help developers do that. A typical customer might use an Android smartphone to access the Internet on the go, a Windows* PC at work, or an Apple iPad* in a café.
Instead of using complex technologies like Objective-C*, Xcode*, and iOS* APIs for Mac*, iPhone*, and iPad; Windows API, Visual Studio*, and C# for Windows PC; and Android APIs, Java*, and Eclipse* for Android smartphones, it is much easier and effective to use HTML5 cross-platform mobile application development tools. The key is to have the right features in your application that deliver a perfect user experience. Second, the app should have an inherent ability to work on new devices that continually hit the market.
HTML5, a markup language, has several features that allow it to run on devices specifically designed to consume less electricity. For example laptops, smartphones, and tablets have processors that consume significantly less power than desktop devices. It is the preferred markup language used today to structure and present content on the Internet.Strategy Analytics predicts that more than a billion HTML5 compatible devices will be in use worldwide by the end of 2013. HTML5 can be used to develop interactive web pages for deployment across multiple operating system platforms and browsers. Hence, cross-platform mobile app development tools based on HTML5 are appealing to mobile app developers.
<continued at main article>
http://www.codeproject.com/Articles/734099/Creating-cool-animations-and-transitions-in-HTML
posted under open source
Creating cool animations and transitions in HTML5 app for Intel Android devices
By , 4 Mar 2014
|
|
Canvas Tag
One problem with earlier versions of HTML was the lack of multimedia techniques. You could not show a video or draw on the screen. With HTML5, new elements such as
<video> and <canvas> have been released. These elements give developers the ability to use multimedia technology in "native" HTML, just by writing some JavaScript* in combination with HTML. A straightforward action that should be provided by multimedia technologies is animation, and now HTML5 has some ways to do it.
One of the most exciting features of HTML5 is the
<canvas> element that can be used to draw vector graphics and engender astonishing effects, interactive games, and animations. The HTML5 Canvas is picture-perfect for creating great visual material that augments UIs, diagrams, photo albums, charts, graphs, animations, and embedded drawing applications. HTML5 Canvas works with JavaScript libraries and CSS3 allowing you to create interactive web-predicated games and animations.
The elementary code for using and setting a canvas looks like this:
<canvas id= "animation" width="150" height="150">

Sorry, your browser doesn't support the HTML5 element canvas.

</canvas>
This looks similar to the
<img> element; the difference is that it doesn't have the src and alt attributes. The <canvas>element has only two characteristics: width and height. If your renderings seem inaccurate, try designating your width and height attributes explicitly in the <canvas> attributes, and not with CSS. The width and height attributes default to 300 and 150, respectively. The id will be used to initialize the canvas using JavaScript, and the text inside will be displayed as a call back when the mobile browser doesn’t support it.Coordinate System
The prerequisite knowledge you need to draw on the canvas is the coordinate system. The canvas is constructed around the
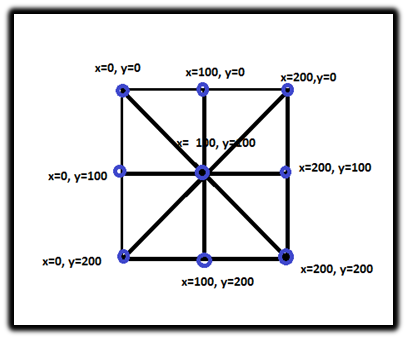
x and y coordinates. If you have worked with any other 2D graphics programming language, you already know the standard Cartesian coordinate system, where (0,0) is the top left corner. If we want to move a square to the right, we have to increase our x-axis value; if we wish to move up, we have to decrease our y-axis value. The diagram below shows how the x and y coordinate system is implemented.
The diagram shows a canvas area that is 200 pixels by 200 pixels:
- The top left corner is x=0, y=0.
- The x value increases horizontally, and the y value increases vertically.
- The bottom right corner is x=200, y=200.
- The center point is x=100, y=100.
We define the init method, which is used for initialization. The canvas is blank. To draw something, JavaScript first needs to get hold of the rendering context. To do this, the
<canvas> element provides a getContext()method that captures the rendering context and its drawing functions. function init ()
{
var cans document.getElementById("animation);
var canctx = canvas.getContect(‘2d’);
}
The cans variable captures the canvas that we can draw the graphics objects on, and
canctx holds the rendering context. In this case it is a 2D graphics object.
This context encompasses the methods for drawing on the canvas such as
arc(), lineto(), and fill().Drawing Tools
The drawing tools for drawing on the canvas are:
- Lines
- Rectangles
- Arcs
- Bezier and quadratic curves
- Circles and semicircles
Drawing lines
We use the
beginpath() method to reset the current drawing on the screen. Then we use the moveto(), lineto(), and stroke() techniques to draw a line on the canvas.canctx.beginPath();canctx.moveTo(x,y);canctx.lineTo(x,y);canctx.stroke(x,y);
The
beginpath() method ensures that we are starting a new path. It begins another path, wiping out the present path (if any). If you discover you're getting an interfacing line in an animation from the start to the end of your path, it may be that you haven't used the beginpath() capacity to start your path/drawing. To make a way with HTML5 Canvas, we can associate different subpaths. The completion purpose of every new subpath turns into the new setting focus.
The
moveTo() method sets the conditions for where the new subpath is to start. The lineTo() method generates subpaths. We can change the look of the line with lineWidth and strokeStyle. The lineWidth element modifies the thickness of the line, and strokeStyle modifies the color.
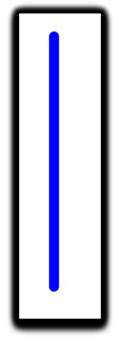
To create a line like the one shown above, we alter the code as below:
context.moveTo(50, 50)‒ places the initial point for the path at (x=20, y=20)context.lineTo(50,200)‒ identifies the end point for the linecontext.lineWidth = 10‒ the width of the linecontext.strokeStyle = "#0000FF"‒ the color of the linecontext.lineCap = "round"‒ makes the ends roundcontext.stroke()‒ smears the line on the canvas
The three possible line caps are:
- Context.round
- Context.square
- Context.butt
Drawing Rectangles
The three ways to draw a rectangular on the canvas are:
fillRect(x,y,width,height)‒ draws a filled rectanglestrokeRect(x,y,width,height)‒ draws a rectangular outlineclearRect(x,y,width,height)‒ clears the given area and makes it fully opaque
All three types of rectangles are shown below.
Drawing a circle and animating it
In this section we will be generating a circle that moves about on the canvas. To generate the circle we will create a
drawcircle function. function drawcircle(x,y)
{
canctx.beginPath();
canctx.arc(x,y,r,0,360,true);
canctx.fill();
}
The
beginpath() method ensures that we are starting a new path. The arc(x, y, radius, startAngle, endAngle, anticlockwise) defines the size and shape of our circle.
The
fill() method fills the circle with the color defined by the value of the fillstyle attribute of the context object.
To move the circle, we just need to alter the x and y values at a particular interval of time using the
setInterval()method to the init function. Fundamentally we just redraw the circle. The animation is actually coming from thesetInterval method. The increment of the circle’s current position gives the effect of movement. Without changing the X and Y values, the circle would not move at all! setInterval(draw,10);
The
setInterval() method requests a function or assesses an expression at definite intervals (in milliseconds).
If you execute the code, you’ll see a smooth moving animation of a ball leaving behind a trace. The reason for this is we do not refresh the frame and all the new drawing is added on top of the old. We will have to clear the frame every time the
draw() function is called to hide this, the coolest (and fastest) way to do this is by just drawing a huge square on top of the whole canvas or by calling the clear function: function draw()
{
canctx.fillStyle = rgb(255,255,255);
canctx.fillRect (0, 0, 400, 400);
if (x + dx > WIDTH || x + dx < 0)
dx = -dx;
if (y + dy > HEIGHT || y + dy < 0)
dy = -dy;
circleX += dx;
circleY += dy;
drawcircle(circleX, circleY);
}
Note:
CircleX and CircleY are the X and Y positions of the circle, while dx and dy are the displacements with respect to the current position.
Transition is the procedure of altering from one form or situation to another. To add transition to HTML5 apps, we use CSS files. For instance, a lingering effect is instant on a link. With a transition, you can spread the extent of the advent of the change. This can be useful to draw attention to a particular part of the application.
Generally, when a CSS property value is altered, the extracted consequence is promptly rationalized, with the affected features instantly varying from the old property value to the new property value. This segment designates a way to stipulate transitions using new CSS properties. Using these properties, the object can be made to smoothly transition from one state to the other.
transition-property
The transition-property line outlines which CSS property we want to change. The default value is ‘
none’, which implies no transition. If we insert a value of ‘all’, all transition properties are applied.transition-duration
The transition-duration property outlines the transition length. When the element changes to the original state, the duration echoes. We specify the duration in seconds (a number followed by an "s") or milliseconds ("ms"). The default is 0s.
transition-timing-function
The transition-timing-function property tells the browser the speed of the transition and how the speed changes over the length of the transition. The default value is ‘ease’. Other pre-defined values are ‘linear’, ‘ease-in’, ‘ease-out’, and ‘ease-in-out’.
transition-delay
The transition-delay property states the interval that occurs before the transition starts, that is, after a transition is prompted, the delay represents the time that lapses before any transition transpires.
    .example {

    transition-property: background-color;

    transition-duration: 5s;

    transition-timing-function: ease-out;

    transition-delay: 2s;

    }
Transition shorthand
We can declare all of these properties in a single shorthand declaration. Consequently, we can prompt the above example as follows:
    .example {

    transition: background-color 5s ease-out 2s;

    }
The authoritative ordinance of the time-cognate values is paramount. The first time value always represents duration, so if you want to include a delay, you must first define a duration.
Triggering a transition
Now that we know the syntax for CSS3 transitions, let us look at how to trigger them. The best way to trigger a transition is by using the: hover pseudo-class. The code for the: hover trigger might look like the following:
    .example {

    background-color: green;

    transition: background-color 5s ease-out 2s;

    }

    .example:hover {

    background-color: red

    }
If we hover over the element, the background color changes from green to red over a five-second duration, after a two-second initial delay.
Transitions triggered by events other than the: hover trigger
Triggering the transition is really not so much about the trigger itself (in the circumstance above, the trigger presence being: hover). What actually makes the transition happen is the transmutation of the element’s state.
There are number of ways apart from the "
hover:trigger" to trigger a transition.Using: active
The: active pseudo-class characterizes the state that occurs when we click an element and hold the mouse button. The code might look like the following:
    .example {

    width: 200px;

    height: 200px;

    transition: width 5s ease-out;

    }

    .example: active {

    height: 400px;

    }
In this code case, the transition of the height property starts when we click and hold on an element, thus preserving the element's "active" state.
Some of the other pseudo-classes that we could use to trigger transitions are focus, checked. We could also trigger a transition with a combination of HTML5, CSS, and JavaScript and create wonderful mobile apps.
Other Related Articles and Resources
HTML5 New tags
HTML5 Graphics
Adding sound to your HTML5 games for Intel® Architecture-based Android* devices
Creating your first HTML5 spaceship game for the Android* OS on Intel® Architecture
HTML5: Painting with Canvas
HTML5 Graphics
Adding sound to your HTML5 games for Intel® Architecture-based Android* devices
Creating your first HTML5 spaceship game for the Android* OS on Intel® Architecture
HTML5: Painting with Canvas
To learn more about Intel tools for the Android developer, visit Intel® Developer Zone for Android.
Intel and the Intel logo are trademarks of Intel Corporation in the U.S. and/or other countries.
Copyright © 2013 Intel Corporation. All rights reserved.
*Other names and brands may be claimed as the property of others.
Copyright © 2013 Intel Corporation. All rights reserved.
*Other names and brands may be claimed as the property of others.
Test Your Apps on Intel Devices for Free
AppThwack lets you test your apps on hundreds of real, physical devices. Upload your code, run your tests, and get a report so you can address any issues before your users find them. Testing on Intel-based Android devices at AppThwack is free. Learn More.
To learn more about Intel tools for the Android developer, visit Intel® Developer Zone for Android.
License
This article, along with any associated source code and files, is licensed under The Code Project Open License (CPOL)
No comments:
Post a Comment