Wednesday, September 7, 2016

Scrum vs Waterfall / Project Manager

Scrum

  • Requirements are not fully known
  • Scrum master may not be a programming expert
  • Project Backlog (list of features/tasks)
  • Sprint Backlog (list of features done in this time period)


Glossarry

  • Estimating
  • Product Backlog
  • Prioritized product backlog
  • Product Owner
  • Release Backlog
  • Scrum Master - Project manager who knows nothing about programing and is not more skilled than team members.
  • Stories
  • Subject matter expert
  • Team member
  • User
  • Velocity

Waterfall

  • Sequential 
  • Complete Requirements
  • Complete Functional Spec / Prototype
  • Complete Design
  • Complete Schedule and Staff
  • Development / Test
  • Alpha sort of working 
  • Beta nearly complete
  • Release
Glossary

  • Project manager

Intro to Agile Scrum in Under 10 Minutes
What is Scrum? Agile Scrum in detail... by Rajamanickam

from: http://www.leanagiletraining.com/agile/waterfall-versus-scrum-how-do-they-compare
WATERFALL VERSUS SCRUM: HOW DO THEY COMPARE?
MARCH 24, 2012
I have recently been asked for advice on how to compare Waterfall (WF) and Scrum.  This is a hard question in some ways: the best way to compare will depend on the person you are talking to.  Another problem is that few people do ‘pure’ waterfall in actual practice. And the variations of Waterfall are many.

Still here are some thoughts that occur to me.  We think these statements often need explanation, but they can be useful as a start for a discussion, eg, ‘should we move from waterfall to Scrum?’

***

Scrum has a prioritized Product Backlog (mainly by Business Value), from which one could execute the Pareto Rule.
WF tends to assume the 100% – 100% rule.   And tends to order the building of the product mainly by technical dependencies or by what the geeks want to do first.

Scrum uses adaptive planning.
WF tries to keep to the initial plan.

Scrum gets feedback from working software early (first sprint, in 2 weeks) and often (every sprint).
WF does not have working software until very late in the whole dev cycle.

WF assumes we know ‘everything’ upfront.
Scrum assumes there is lots we don’t know (yet), and focuses on maximizing learning throughout the project.

WF tries to minimize change (a change control board for any requirements changes, for example).
Scrum tries to maximize the benefits of good change (eg, learning), and minimize the negative impact of bad change.

Scrum assumes change is normal, and anyway much of it can’t be controlled usefully.
WF assumes change is bad and can be controlled (usually).

WF puts most responsibility on the PM.
Scrum puts most responsibility on the small dedicated Team.
(WF uses a diffuse work group, with only the PM with clear overall responsibility.)

WF assumes the PM should plan the work.
Scrum assumes it is best if the Team plans its own work and re-plans.

WF prefers ‘planning from the center’ (e.g., by the PM).  And the workers just execute what they are given.
Scrum prefers more self-organization, and using the full ‘complex adaptive system’ (a tight thinking adaptive Team).

Scrum optimizes business value, time to market and quality.
WF optimizes conformance to schedule and budget.

WF’s typical problem is analysis paralysis and being late. Scrum addresses these.
People using Scrum often err in not thinking quite enough up-front….an easier problem to fix, we think.

When people do WF they typically are thinking: “If I just follow the process and the plan, all will be well.”
Scrum tries to force the Team to think for themselves, in their specific situation. Hence, it is a bare framework of things that are essential for every effort. Always other things, in addition to Scrum, must be done.

WF has weak controls (eg, conformance to schedule and budget).
Scrum has strong and frequent controls (e.g., did you all get all those features done this past 2 weeks?)…which enables faster improvement.

Notes:
Unprofessional people often say they are doing ‘Scrum.’  Above we are talking about vigorous professional Scrum, not ‘cowboy Scrum’ or ScrumButt.

Good people forced into WF typically use agile-scrum ideas to make it really work.  Above we are talking about ‘true’ Waterfall. While ‘true’ Waterfall rarely exists, we think that one can still see that the ideas and practices of Waterfall, as much as they remain in real practice, impede progress compared to Agile.

Final comment: These are not all the statements one could make.  There probably are other useful comparisons. Your feedback is very welcome.

Monday, August 8, 2016

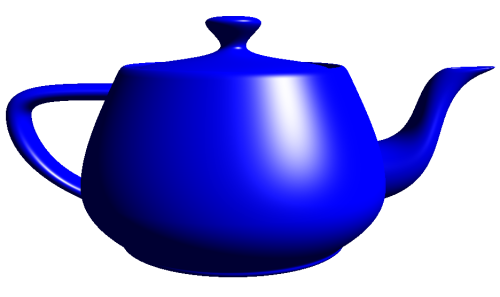
3D Graphics Teapot

3D Graphics Teapot


How to model a teapot
https://en.wikibooks.org/wiki/OpenGL_Programming/Modern_OpenGL_Tutorial_07
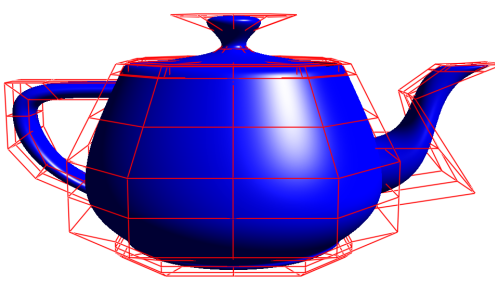
It's madeof 32 bezier patches and you can easily 

Code to do teapot in C++
Bézier Curves and Surfaces: the Utah Teapot
http://www.scratchapixel.com/lessons/advanced-rendering/bezier-curve-rendering-utah-teapot

find it if you google for "utah teapot" 

I have some old class code from fall 2001 that does teapots via Bezier 
patches: 
http://www.cs.unc.edu/~vogel/COMP236/program3/index.html 

Original teapot data

https://sjbaker.org/wiki/index.php?title=The_History_of_The_Teapot


The Teapot DataSet

NewellTeaset.jpg

"There is no spoon"
The teapot is made from nine patches - some reflected in two axes , others in one axis only. 
Rim:
  { 102, 103, 104, 105,   4,   5,   6,   7,
        8,   9,  10,  11,  12,  13,  14,  15 }
  Body:
    {  12,  13,  14,  15,  16,  17,  18,  19,
       20,  21,  22,  23,  24,  25,  26,  27 }
    {  24,  25,  26,  27,  29,  30,  31,  32,
       33,  34,  35,  36,  37,  38,  39,  40 }
  Lid:
    {  96,  96,  96,  96,  97,  98,  99, 100,
      101, 101, 101, 101,   0,   1,   2,   3 }
    {   0,   1,   2,   3, 106, 107, 108, 109,
      110, 111, 112, 113, 114, 115, 116, 117 }
  Handle:
    {  41,  42,  43,  44,  45,  46,  47,  48,
       49,  50,  51,  52,  53,  54,  55,  56 }
    {  53,  54,  55,  56,  57,  58,  59,  60,
       61,  62,  63,  64,  28,  65,  66,  67 }
  Spout:
    {  68,  69,  70,  71,  72,  73,  74,  75,
       76,  77,  78,  79,  80,  81,  82,  83 }
    {  80,  81,  82,  83,  84,  85,  86,  87,
       88,  89,  90,  91,  92,  93,  94,  95 }

  Vertices:

    {  0.2000,  0.0000, 2.70000 }, {  0.2000, -0.1120, 2.70000 },
    {  0.1120, -0.2000, 2.70000 }, {  0.0000, -0.2000, 2.70000 },
    {  1.3375,  0.0000, 2.53125 }, {  1.3375, -0.7490, 2.53125 },
    {  0.7490, -1.3375, 2.53125 }, {  0.0000, -1.3375, 2.53125 },
    {  1.4375,  0.0000, 2.53125 }, {  1.4375, -0.8050, 2.53125 },
    {  0.8050, -1.4375, 2.53125 }, {  0.0000, -1.4375, 2.53125 },
    {  1.5000,  0.0000, 2.40000 }, {  1.5000, -0.8400, 2.40000 },
    {  0.8400, -1.5000, 2.40000 }, {  0.0000, -1.5000, 2.40000 },
    {  1.7500,  0.0000, 1.87500 }, {  1.7500, -0.9800, 1.87500 },
    {  0.9800, -1.7500, 1.87500 }, {  0.0000, -1.7500, 1.87500 },
    {  2.0000,  0.0000, 1.35000 }, {  2.0000, -1.1200, 1.35000 },
    {  1.1200, -2.0000, 1.35000 }, {  0.0000, -2.0000, 1.35000 },
    {  2.0000,  0.0000, 0.90000 }, {  2.0000, -1.1200, 0.90000 },
    {  1.1200, -2.0000, 0.90000 }, {  0.0000, -2.0000, 0.90000 },
    { -2.0000,  0.0000, 0.90000 }, {  2.0000,  0.0000, 0.45000 },
    {  2.0000, -1.1200, 0.45000 }, {  1.1200, -2.0000, 0.45000 },
    {  0.0000, -2.0000, 0.45000 }, {  1.5000,  0.0000, 0.22500 },
    {  1.5000, -0.8400, 0.22500 }, {  0.8400, -1.5000, 0.22500 },
    {  0.0000, -1.5000, 0.22500 }, {  1.5000,  0.0000, 0.15000 },
    {  1.5000, -0.8400, 0.15000 }, {  0.8400, -1.5000, 0.15000 },
    {  0.0000, -1.5000, 0.15000 }, { -1.6000,  0.0000, 2.02500 },
    { -1.6000, -0.3000, 2.02500 }, { -1.5000, -0.3000, 2.25000 },
    { -1.5000,  0.0000, 2.25000 }, { -2.3000,  0.0000, 2.02500 },
    { -2.3000, -0.3000, 2.02500 }, { -2.5000, -0.3000, 2.25000 },
    { -2.5000,  0.0000, 2.25000 }, { -2.7000,  0.0000, 2.02500 },
    { -2.7000, -0.3000, 2.02500 }, { -3.0000, -0.3000, 2.25000 },
    { -3.0000,  0.0000, 2.25000 }, { -2.7000,  0.0000, 1.80000 },
    { -2.7000, -0.3000, 1.80000 }, { -3.0000, -0.3000, 1.80000 },
    { -3.0000,  0.0000, 1.80000 }, { -2.7000,  0.0000, 1.57500 },
    { -2.7000, -0.3000, 1.57500 }, { -3.0000, -0.3000, 1.35000 },
    { -3.0000,  0.0000, 1.35000 }, { -2.5000,  0.0000, 1.12500 },
    { -2.5000, -0.3000, 1.12500 }, { -2.6500, -0.3000, 0.93750 },
    { -2.6500,  0.0000, 0.93750 }, { -2.0000, -0.3000, 0.90000 },
    { -1.9000, -0.3000, 0.60000 }, { -1.9000,  0.0000, 0.60000 },
    {  1.7000,  0.0000, 1.42500 }, {  1.7000, -0.6600, 1.42500 },
    {  1.7000, -0.6600, 0.60000 }, {  1.7000,  0.0000, 0.60000 },
    {  2.6000,  0.0000, 1.42500 }, {  2.6000, -0.6600, 1.42500 },
    {  3.1000, -0.6600, 0.82500 }, {  3.1000,  0.0000, 0.82500 },
    {  2.3000,  0.0000, 2.10000 }, {  2.3000, -0.2500, 2.10000 },
    {  2.4000, -0.2500, 2.02500 }, {  2.4000,  0.0000, 2.02500 },
    {  2.7000,  0.0000, 2.40000 }, {  2.7000, -0.2500, 2.40000 },
    {  3.3000, -0.2500, 2.40000 }, {  3.3000,  0.0000, 2.40000 },
    {  2.8000,  0.0000, 2.47500 }, {  2.8000, -0.2500, 2.47500 },
    {  3.5250, -0.2500, 2.49375 }, {  3.5250,  0.0000, 2.49375 },
    {  2.9000,  0.0000, 2.47500 }, {  2.9000, -0.1500, 2.47500 },
    {  3.4500, -0.1500, 2.51250 }, {  3.4500,  0.0000, 2.51250 },
    {  2.8000,  0.0000, 2.40000 }, {  2.8000, -0.1500, 2.40000 },
    {  3.2000, -0.1500, 2.40000 }, {  3.2000,  0.0000, 2.40000 },
    {  0.0000,  0.0000, 3.15000 }, {  0.8000,  0.0000, 3.15000 },
    {  0.8000, -0.4500, 3.15000 }, {  0.4500, -0.8000, 3.15000 },
    {  0.0000, -0.8000, 3.15000 }, {  0.0000,  0.0000, 2.85000 },
    {  1.4000,  0.0000, 2.40000 }, {  1.4000, -0.7840, 2.40000 },
    {  0.7840, -1.4000, 2.40000 }, {  0.0000, -1.4000, 2.40000 },
    {  0.4000,  0.0000, 2.55000 }, {  0.4000, -0.2240, 2.55000 },
    {  0.2240, -0.4000, 2.55000 }, {  0.0000, -0.4000, 2.55000 },
    {  1.3000,  0.0000, 2.55000 }, {  1.3000, -0.7280, 2.55000 },
    {  0.7280, -1.3000, 2.55000 }, {  0.0000, -1.3000, 2.55000 },
    {  1.3000,  0.0000, 2.40000 }, {  1.3000, -0.7280, 2.40000 },
    {  0.7280, -1.3000, 2.40000 }, {  0.0000, -1.3000, 2.40000 },

As you can probably guess, the numbers in the patch array index into the vertex array.
If you look again at the photo of the real teapot, you can see that it's quite a bit taller than the classic computer teapot.

he original teapot data has no bottom. Some of the data sets that are out there (depressingly, this includes the one in the GLU and GLUT distributions) have added a bottom - but that is definitely 'impure'. Here is the data for the bottom:
  Bottom:
    { 118, 118, 118, 118, 124, 122, 119, 121,
      123, 126, 125, 120,  40,  39,  38,  37 }

  Vertices 118..126:
    {  0.0000,  0.0000, 0.00000 }, {  1.4250, -0.7980, 0.00000 },
    {  1.5000,  0.0000, 0.07500 }, {  1.4250,  0.0000, 0.00000 },
    {  0.7980, -1.4250, 0.00000 }, {  0.0000, -1.5000, 0.07500 },
    {  0.0000, -1.4250, 0.00000 }, {  1.5000, -0.8400, 0.07500 },
    {  0.8400, -1.5000, 0.07500 }

How to use timer for animation

http://stackoverflow.com/questions/24217988/using-android-timers-to-implement-graphical-movement

The most common approach I have seen is somewhat different. It's more typical to update the animation while preparing to render each frame, and base the update on the amount of time that has passed since the last frame.
Since distance is velocity multiplied by time, you do this by assigning a velocity vector to each of your objects. Then when it's time to update the animation, you take the time difference since the last update, and the increment you apply to your positions is the time difference multiplied by the velocity. The velocity is constant as long as you just use a linear motion, but can also change over time for more complex animations, e.g. due to gravity, collision with other objects, etc.
If you're using OpenGL on Android, you're probably using a GLSurfaceView for your rendering. By default, the GLSurfaceView will already invoke your rendering function continuously, up to 60 fps if your rendering can keep up with the display refresh rate.
What you roughly do is keep the time when the last frame was rendered as a member variable in your GLSurfaceView.Renderer implementation. Then each time onDraw() is called, you get the new time, and subtract the last frame time from this time to get the time increment. Then you store away the new time in your member variable, multiply the time increment by the velocity, and add the result to your positions.
After the positions are updated, you render your objects as you normally would.
To give you the outline, the following is a slightly adapted piece of (pseudo-)code I copied from my answer to a similar question (Android timing in OpenGL ES thread is not monotonic):
public void onDrawFrame(GL10 gl) {
    currentTime = SystemClock.elapsedRealtime()
    deltaTime = currentTime - lastFrameTime
    lastFrameTime = currentTime
    update animation based on deltaTime
    draw frame
}
Where lastFrameTime is a member variable, currentTime a local variable.
shareimprove this answer

Here is how one grad student renders a teapot:

http://vis.berkeley.edu/~joshea/projects/bezier/


The basic OpenGL functions for curves are (in C):

    glMap1f(target, u_min, u_max, stride, order, point_array); glEnable(target); glEvalCoord1f(u);
The first two are setup functions. The first, glMap1f(), is how we specify all the control information (points, colors, or whatever). The target is the kind of control information you are specifying and the kind of information you want generated, such as:
    GL_MAP1_VERTEX_3, a vertex in 3D GL_MAP1_VERTEX_4, a vertex in 4D (homogeneous coordinates GL_MAP1_COLOR_4, a RGBA color GL_MAP1_NORMAL, a normal vector GL_MAP1_TEXTURE_COORD_1, a texture coordinate. (We'll talk about textures in a few weeks.)
The u_min and u_max arguments are just the min and max paramater, so they are typically 0 and 1, though if you just want a piece out of the curve, you can use different values. For example, to get the middle fifth of the curve, you could give u_min=0.4 and u_max=0.6.

Open Source: OpenGL ES Curve Library For iOS


OpenGL ES does not have a built in library for curve generation, and while the formulas for creating curves can be readily found there are so many different types and it is always nice to have everything done for you. Core Animation provides a few different types of curves, but there are many more. I found out about some great open source code that performs the necessary calculations for 22 different types of curves.  In case you’re wondering why you might need this data — it is extremely useful for animation.  Also, this is not only an OpenGL curve library, you can use the functions for different Core Animation curves also.
The library is from Jeff Lamarche, co-author of Beginning iPhone 3 Developmentand More iPhone 3 Development books you can find out more about the functions, and see some of the examples of the curves at:
More Animation Curves Than You Can Shake A Stick At
Further information on how to use the functions can be found at the above link.

Tuesday, July 19, 2016

Android OpenGL Tutorials

Android OpenGL Tutorials

This is the official Google Android documentation
https://developer.android.com/training/graphics/opengl/index.html

pdf all about opengl es
http://www.pdfdrive.net/all-about-opengl-es-2-e560764.html

Anton tutorial $9.50 kindle book
https://www.amazon.com/Antons-OpenGL-Tutorials-Anton-Gerdelan-ebook/dp/B00LAMQYF2/ref=sr_1_1?s=books&ie=UTF8&qid=1470839771&sr=1-1&keywords=opengl


http://www.pdfdrive.net/opengl-es-302-april-8-2013-khronos-group-e10597635.html


https://software.intel.com/en-us/android/articles/porting-opengl-games-to-android-on-intel-atom-processors-part-2
The OpenGL ES 1.1 application programming interface (API) is a subset of the OpenGL 1.x APIs that have been used on desktop Linux* and Windows* systems for decades. Likewise, the OpenGL ES 2.0 API is a subset of the OpenGL 2.0 API from desktop systems. Therefore, any game porting project should start with an assessment of the OpenGL feature set that the game’s code uses to determine the age of the code and identify the parts that you must rewrite because of differences between the OpenGL version used and the OpenGL ES version targeted on Android.
The major differences between OpenGL 2.0 and OpenGL ES 2.0 fall into three main categories: geometry specification, geometry transformation, and changes in the OpenGL Shading Language (GLSL). OpenGL 2.0 offers four ways to specify geometry: immediate mode, display lists, vertex arrays, and vertex buffer objects. OpenGL ES 2.0 does not support immediate mode (glBegin and glEnd blocks) or display lists, so you must specify geometry with either vertex arrays or vertex buffer objects.
OpenGL 2.0 has functions for loading the model view, projection, and texture matrices plus some convenience functions for combining these matrices, such aglTranslateglRotate, and glScale. OpenGL ES 2.0 has neither these functions nor any of the lighting-related functions because the fixed-function pipeline has been replaced with the shader programming model. For OpenGL ES 2.0, matrix and lighting calculations should be made in the vertex shader.
The shader language for OpenGL ES 2.0 (GLSL ES) is also a subset of the shader language for desktop OpenGL 2.0 (GLSL). One major difference is that GLSL has built-in variables to access states in the fixed-function pipeline in the vertex shader (such as gl_ModelViewMatrix). Because OpenGL ES 2.0 does not support the fixed-function pipeline, these variables are not supported in GLSL ES.
The following OpenGL 2.0 features are lacking in OpenGL ES 2.0:
  • Immediate mode geometry specification
  • Display list geometry specification
  • All fixed-function pipeline processing
  • Fixed transformation and lighting
  • Matrix stack and matrix transformations
  • User clip planes
  • Line and polygon smoothing and stipple
  • Pixel rectangles and bitmaps
  • One-dimensional textures and some texture wrap modes
  • Occlusion queries
  • Fog

The GLU Library

Desktop versions of OpenGL typically provide a library of convenience functions called the OpenGL Utility Library. The GLU consists of functions that are not strictly part of OpenGL or essential for using OpenGL but are helpful when coding 3D applications for OpenGL. A typical GLU library includes functions for constructing model-view and projection matrices, performing general matrix calculations, computing quadric surfaces, tessellating polygons, generating mipmaps, and reporting error messages. Most games on desktop OpenGL use some GLU functions, which can be a problem because Android provides only a minimal implementation of GLU that is available only from the SDK. These classes are listed in Table 2.
Table 2. Summary of Android Classes That Provide GLU Functionality
ClassFunctionality
android.opengl.GLUCreating projection matrices for OpenGL ES
android.graphics.MatrixCreating model–view and general matrices
OpenGL ES 1.1 and 2.0 provide support for generating mipmaps, so the missing functionality is computing quadric surfaces and support for tessellating polygons. If you need these functions, other open source implementations of GLU exist that are more complete and suitable for use with the Android NDK—for example, GLU ES.


GLU 1.3 port for OpenGL ES 1.0 (CM) and above

GLU ES

GLU 1.3 partitial port (libutil and libtess components only) for OpenGL ES 1.x (CM - Common profile) and above. This port supports:

  • Quadrics: gluNewQuadric(), gluDeleteQuadric(), gluQuadricCallback(), gluQuadricNormals(), gluQuadricTexture(), gluQuadricOrientation(), gluQuadricDrawStyle(), gluCylinder(), gluDisk(), gluPartialDisk(), gluSphere().
  • Registry: gluGetString(), gluCheckExtension(), gluErrorString().
  • Projection matrix manipulation: gluOrtho2D(), gluPerspective(), gluLookAt(), gluProject(), gluUnProject(), gluUnProject4(), gluPickMatrix().
  • 2D Mipmaps: gluScaleImage(), gluBuild2DMipmapLevels(), gluBuild2DMipmaps().
  • Tesselation: gluBeginPolygon(), gluDeleteTess(), gluEndPolygon(), gluGetTessProperty(), gluNewTess(), gluNextContour(), gluTessBeginContour(), gluTessBeginPolygon(), gluTessCallback(), gluTessEndContour(), gluTessEndPolygon(), gluTessNormal(), gluTessProperty(), gluTessVertex().
https://maniacdev.com/2009/12/iphone-opengles-animation-tutorial
Here’s some other OpenGL ES Tutorials, and my list of iPhone OpenGL ES resources.

https://maniacdev.com/2009/04/converting-opengl-code-to-iphone-opengl-es
One of the major problems I found was that the Glu library is missing in OpenGL ES, fortunately Michael Gorchak has begun work on a GluES librarywhich includes much of the missing funcitonality also in the Cocos2D frameworkyou can find implementations of gluLookAt and gluPerspective functions in the Glu module.


http://www.cs.utah.edu/gdc/projects/alpha1/help/man/html/model_repo/model_teapot/model_teapot.html
Teapot Subdivision byRuss Fish (standing Martin Newell's and Hank Driskill's shoulders)
The original model was passed from researcher to researcher for many years, since design systems that produced good curved surface models were extremely rare in those days, and it made a good benchmark for rendering methods. Frank Crow posted the original Teapot Bezier patch control points to the Net, perhaps sometime around 1986.

The original teapot model had a few problems:  It was very visibly NOT a solid model.

Minor visible parts were left out. There was no bottom to the teapot, nor a rim for the lid to rest on. You could see in through the bottom, or past the edge of the lid, to see that there was no inside, either.

The intersection between the spout and the body of the teapot was left implicit. The spout was modeled to simply penetrate through the body surface, so the hidden-surface portion of the image rendering method covered up the portion of the spout which was inside the body.

It was not round. It was pretty close (within 1% or so), so perhaps this is a quibble. A wheel-thrown teapot would be round, but a moulded teapot like the real one of Martin's which the model represents need not be round. However, the very slightly four-lobed cross-sectional shape of the teapot was as close as a cubic Bezier curve could come to representing a circular cross section, reflecting the inability of non-rational Bezier curves to represent conic sections such as circles.

In 1992, Hank Driskill got the idea to make a modern trimmed-NURBS solid model of the Utah Teapot. This was featured (with the addition of warp nacelles) on his SigGraph Tee-Shirt Contest winning "Utah, the Next Generation" tee-shirts.

http://cs.lmu.edu/~ray/notes/openglexamples/

https://www3.ntu.edu.sg/home/ehchua/programming/android/Android_3D.html

https://www.khronos.org/assets/uploads/books/openglr_es_20_programming_guide_sample.pdf

Transformations in OpenGL Transformations in OpenGL

https://www.cs.cmu.edu/afs/cs/.../lec03a.pdf

Carnegie Mellon University
Some sample code. Display(){ … glMatrixMode(GL_MODELVIEW);. glLoadIdentity();. glTranslatef(0.0, 0.0, -6.0);. glRotatef(45.0, 0.0, 0.0);. glScalef(2.0, 2.0, 2.0);.

CUNY

In this document Create an Activity with GLSurfaceView Draw a Shape on GLSurfaceView Define a Triangle Draw the Triangle Apply Projection and Camera Views Add Motion Respond to Touch Events Related Samples API Demos - graphics OpenGL ES 1.0 Sample TouchRotateActivity See also 3D with OpenGL OpenGL ES 2.0 Tutorials: O


http://www.programforandroid.com/android-programming-tutorials/opengl-es-2-0/

OpenGL ES 2.0


This tutorial shows you how to create a simple Android application that uses the OpenGL ES 2.0 API to perform some basic graphics operations. You’ll learn how to:
  • Create an activity using GLSurfaceView and GLSurfaceView.Renderer
  • Create and draw a graphic object
  • Define a projection to correct for screen geometry
  • Define a camera view
  • Rotate a graphic object
  • Make graphics touch interactive
The Android framework supports both the OpenGL ES 1.0/1.1 and OpenGL ES 2.0 APIs. You should carefully consider which version of the OpenGL ES API (1.0/1.1 or 2.0) is most appropriate for your needs. For more information, see Choosing an OpenGL API Version. If you would prefer to use OpenGL ES 1.0, see the OpenGL ES 1.0 tutorial.
Before you start, you should understand how to create a basic Android application. If you do not know how to create an app, follow the Hello World Tutorial to familiarize yourself with the process.
Caution: OpenGL ES 2.0 is currently not supported by the Android Emulator. You must have a physical test device running Android 2.2 (API Level 8) or higher in order to run and test the example code in this tutorial.


Tuesday, April 5, 2016

Android x86 Emulator Accelerator HAXM Install

Android x86 Emulator Accelerator HAXM Install


based on this tip on stackoverflow:

http://stackoverflow.com/questions/26355645/error-in-launching-avd-with-amd-processor


go to SDK manager
check off the HAXM


Make sure you have installed HAXM installer on your SDK Manager.
Android SDK Manager
After you download it and make sure you run the setup located in:{SDK_FOLDER}\extras\intel\Hardware_Accelerated_Execution_Manager\intelhaxm.exe
Note: in Android Studio, the command "intelhaxm.exe" has been changed to "intelhaxm-android.exe"
If you get the error "VT not supported" during the installation disable Hyper-V on windows features. You can execute this command dism.exe /Online /Disable-Feature:Microsoft-Hyper-V. You will also need "Virtualization Technology" to be enabled on your BIOS

Error: 740
Elevated permissions are required to run DISM.
Use an elevated command prompt to complete these tasks.

Starting DISM
The first thing we need to do in order to run DISM is have an elevated command prompt open.  Simply going Start –> Run –> cmd –> Enter won’t do the trick as that runs with user privileges.  What we need to do is either do Start –> Run –> Cmd –> Shift+CTRL+Enter or Click on Start type cmd and when it appear in the search box, right click on it and choose “Run as Administrator”

AMD - says  this computer cannot support HAXM virtualization
Error: 0x800f080c

Feature name Microsoft-Hyper-V is unknown.
A Windows feature name was not recognized.
Use the /Get-Features option to find the name of the feature in the image and tr
y the command again.

C:\Users\XXXXX\AppData\Local\Android\sdk


Wednesday, March 30, 2016

Android Intent Is Like Asynchronous API Call

Android Intent Is Like Asynchronous API Call

What is a Intent ?

Intent is basically a message that is passed between components (such as ActivitiesServices, Broadcast Receivers, and Content Providers). So, it is almost equivalent to parameters passed to API calls. The fundamental differences between API calls and intents’ way of invoking components are:
  • API calls are synchronous while intent-based invocations are asynchronous.
  • API calls are compile time binding while intent-based calls are run-time binding.
Of course, Intents can be made to work exactly like API calls by using what are called explicit intents, which will be explained later. But more often than not, implicit intents are the way to go and that is what is explained here.
One component that wants to invoke another has to only express its’ intent to do a job. And any other component that exists and has claimed that it can do such a job through intent-filters, is invoked by the android platform to accomplish the job. This means, both the components are not aware of each other’s existence and can still work together to give the desired result for the end-user.
This invisible connection between components is achieved through the combination of intents, intent-filters and the android platform.
This leads to huge possibilities like:
  • Mix and match or rather plug and play of components at runtime.
  • Replacing the inbuilt android applications with custom developed applications.
  • Component level reuse within and across applications.
  • Service orientation to the most granular level, if I may say.
  • Here is additional description about intent, almost formal.
An intent is an abstract description of an operation to be performed. It can be used with startActivityto launch an Activity, broadcastIntent to send it to any interested BroadcastReceiver components, and startService(Intent) or bindService(Intent, ServiceConnection, int) to communicate with a background Service.
An Intent provides a facility for performing late runtime binding between the code in different applications. Its most significant use is in the launching of activities, where it can be thought of as the glue between activities. It is basically a passive data structure holding an abstract description of an action to be performed. The primary pieces of information in an intent are:
  • action The general action to be performed, such as ACTION_VIEW, ACTION_EDIT, ACTION_MAIN, etc.
  • data The data to operate on, such as a person record in the contacts database, expressed as a Uri.
On this data structure is that the android is implemented as you read the following documentation is very helpful:

Other answers: 

Intents are get widely used in android to switch from one activity to other . it is good practice to use intents . Using intents we can pass/send values from one activity to another. So it can be used as value passing mechanism. Also its syntax is very simple.so why to think about threads ?

Intents are asynchronous messages which allow application components to request functionality from other Android components. Intents allow you to interact with components from the own and other applications. For example an activity can start an external activity for taking a picture.

Intents are objects of the android.content.Intent type. Your code can send them to the Android system defining the components you are targeting. For example via the startActivity() method you can define that the intent should be used to start an activity. An intent can contain data via a Bundle. This data can be used by the receiving component.

To start an activity use the method startActivity(intent). This method is defined on the Context object which Activity extends.

Intel x86 Computer Processor Architecture

Intel x86 Computer Processor Architecture


http://www.computerweekly.com/opinion/Intel-x86-and-IBM-POWER-CPUs-Which-When-Why
... Intel does everything well  Intel x86 made its mass market debut in 1982 in the IBM PC, known as the Intel 8088. That’s over 30 years’ ago. Since then, Intel has made significant enhancements to the instruction set architecture to keep it relevant in a market where 18 months is obsolescence. They moved from 16-bit to 32-bit and now 64-bit. They have added hardware accelerators on the chip, and they have even built Risc instruction into the architecture to speed up some of the Cics instructions that plagued performance. Intel x86 runs in everything from supercomputers to servers to desktops and laptops. Intel does everything well. Some would say “good enough”. [survived iAPX432 and Itanium designed to replace it]

vs IBM power: mission-critical applications.  The current IBM Power architecture design began in 1997 and the processor was announced in 2001 as the Power4. It was the first multicore processor in the industry. Comparing the x86 and Power processors on a micro-benchmark level will show little raw performance advantages for either. Comparing the two using enterprise workloads will demonstrate a significant advantage for Power in data workloads such as databases, data warehouses, data transaction processing, data encryption/compression, and certainly in high-performance computing, which most in business think of as analytics.

IBM fielded the Power4 processor back in October 2001, which was the first RISC/Unix processor to have two cores and to break the 1 GHz clock speed barrier

Tuesday, March 29, 2016

List of Worst Failed Computer Projects

Failed Computer Projects

Ada computer language


. NeXT Computer (1988): Based on the Motorola’s new 25MHz 68030 CPU and including 8MB-64MB of RAM, a 330MB hard drive and an 1120x832 grayscale display, Steve Jobs’ NeXT station cost $10,000 a pop. It was inaccessible to most and didn’t sell very well. Despite its limited commercial success, NeXT played a pivotal role in history. 

The 16 Worst Failed Computers of All Time -...
www.maximumpc.com/the-16-worst-failed-computers-of-all-time
14. Commodore Plus/4 (1984): Commodore released like 2,000 computers in about 5 years time. That’s baffling. The Plus/4 was a home computer with a built-in

12. IBM PS/2 (1987): How ya’ gonna’ do it? PS/2 It! Or not. The Personal System/2 was IBM’s failed attempt to regain control of the clone market via a closed, proprietary architecture.

HP3000 (first ship) was failure. Did not take into account moving data from memory into stack registers

HP 300 (wikipedia)  The HP 300 "Amigo" was a computer produced by Hewlett Packard (HP) in the late 1970s based loosely on the stack-based HP 3000, but with virtual memory for both code and data. It introduced built-in networking, automatic spelling correction, multiple windows (on a character based screen), and labels adjacent to vertically stacked user function keys, now used on ATMs and gas pumps. The HP300 featured HP-IB (later IEEE-488) interface (IF) as the I/O bus, an 8" floppy disk, and a built-in fixed 12M hard drive later common on PCs. The HP300 was cut-short from being a commercial success despite the huge engineering effort, which included HP-developed and -manufactured silicon on sapphire (SOS) processor and I/O chips. HP Computer Systems Division General Manager (GM), Doug Spreng, decided the file system differences between the division's money making HP3000 line and the burgeoning HP300 would keep the HP300 from being successful and killed the product. HP built two semi-truck loads of units before shutting down the HP300 production line to meet customer contractual agreements


iapx 432 final project The iAPX 432 was a flop and was discontinued only four years after its release. Speed was the main reason that the processor failed, although many programmers did not see Ada as the way of the future and therefore ignored the chip. The reason the 432 was so slow was that it verified many memory accesses (causing a memory read), its instructions were not aligned and took a while to decode, it did not have a large enough cache, it did not have enough registers, and it had extra chips which had to communicate. The success of the 80286 sealed its fate; as mentioned above it was four times faster than the 432. The iAPX 432 taught Intel a lot about what could and could not be done, and it was impressive that such a complex a system could be created with the available technology, but it was too complicated for practical use. Tandem rejects iAPX paper: why is it 4x slower than 8086? 50% of compiler instructions unneccesary dvorak Once released the chip proved to be a woofing dog the designers gave up on it as a product and moved forward with some of the ideas used to design the chip. It’s believed that it was given up on after 1984 although supplies of the chipset may have still been available as late as 1993. The ideas behind the chip continued and slowly evolved into what is today’s Intel 960 embedded processor Everything changed back once the 432 hit the market and was determined to be a dog. The 432 was simply too ambitious an undertaking.

http://dtrace.org/blogs/bmc/2008/07/18/revisiting-the-intel-432/ Posted on July 18, 2008
our many failures go largely unstudied — and the rich veins of wisdom that these failures generate live on only in oral tradition passed down by the perps (occasionally) and the victims (more often).

A counterexample to this — and one of my favorite systems papers of all time — is Robert Colwell‘s brilliant Performance Effects of Architectural Complexity in the Intel 432. This paper, which dissects the abysmal performance of Intel’s infamous 432, practically drips with wisdom, and is just as relevant today as it was when the paper was originally published nearly twenty years ago.

For those who have never heard of the Intel 432, it was a microprocessor conceived of in the mid-1970s to be the dawn of a new era in computing, incorporating many of the latest notions of the day. But despite its lofty ambitions, the 432 was an unmitigated disaster both from an engineering perspective (the performance was absolutely atrocious) and from a commercial perspective (it did not sell — a fact presumably not unrelated to its terrible performance). To add insult to injury, the 432 became a sort of punching bag for researchers, becoming, as Colwell described, “the favorite target for whatever point a researcher wanted to make.”

But as Colwell et al. reveal, the truth behind the 432 is a little more complicated than trendy ideas gone awry; the microprocessor suffered from not only untested ideas, but also terrible execution. For example, one of the core ideas of the 432 is that it was a capability-based system, implemented with a rich hardware-based object model. This model had many ramifications for the hardware, but it also introduced a dangerous dependency on software: the hardware was implicitly dependent on system software (namely, the compiler) for efficient management of protected object contexts (“environments” in 432 parlance). As it happened, the needed compiler work was not done, and the Ada compiler as delivered was pessimal: every function was implemented in its own environment, meaning that every function was in its own context, and that every function call was therefore a context switch!. As Colwell explains, this software failing was the greatest single inhibitor to performance, costing some 25-35 percent on the benchmarks that he examined.

If the story ended there, the tale of the 432 would be plenty instructive — but the story takes another series of interesting twists: because the object model consumed a bunch of chip real estate (and presumably a proportional amount of brain power and department budget), other (more traditional) microprocessor features were either pruned or eliminated. The mortally wounded features included a data cache (!), an instruction cache (!!) and registers (!!!). Yes, you read correctly: this machine had no data cache, no instruction cache and no registers — it was exclusively memory-memory. And if that weren’t enough to assure awful performance: despite having 200 instructions (and about a zillion addressing modes), the 432 had no notion of immediate values other than 0 or 1. Stunningly, Intel designers believed that 0 and 1 “would cover nearly all the need for constants”, a conclusion that Colwell (generously) describes as “almost certainly in error.” The upshot of these decisions is that you have more code (because you have no immediates) accessing more memory (because you have no registers) that is dog-slow (because you have no data cache) that itself is not cached (because you have no instruction cache). Yee haw!