Monday, November 28, 2016

Subaru Legacy Headlight Replacement 9007 HB5

Subaru Legacy Headlight Replacement 9007 HB5

9004 / HB1 does NOT fit.


Subaru Style:9007 / HB5

Fits 2001 Subaru Legacy
1998-2004 GT; 4 Cyl 2.5L;
1998-2002 GT Limited; 4 Cyl 2.5L;
1999-2004 L; 4 Cyl 2.5L;

2012-2015 Mazda 5 USES h11

Thursday, October 27, 2016

ASP.NET MVC Hotel Booking System Using AngularJS

ASP.NET MVC Hotel Booking System Using AngularJS

In this article, we will learn how to create a simple web based Hotel Room Booking System, using MVC, AngularJS, and WebAPI.

Using AngularJs, ASP.NET MVC, Web API and EntityFramework to build NLayered Single Page Web Applications

Using AngularJs, ASP.NET MVC, Web API and EntityFramework to build NLayered Single Page Web Applications

see codeproject

http://www.codeproject.com/Articles/791740/Using-AngularJs-ASP-NET-MVC-Web-API-and-EntityFram

In this article, I'll show you how to develop a Single-Page Web Application (SPA) from ground to up using the following tools:
  • ASP.NET MVC and ASP.NET Web API as web framework.
  • Angularjs as SPA framework.
  • EntityFramework as ORM (Object-Relational Mapping) framework
  • Castle Windsor as Dependency Injection framework.
  • Twitter Bootstrap as HTML/CSS framework.
  • Log4Net for logging, AutoMapper for object-to-object mapping.
  • And ASP.NET Boilerplate as startup template and application framework.
ASP.NET Boilerplate [1] is an open source application framework that combines all of these frameworks and libraries to make you start easily to develop your application. It provides us an infrastructure to develop applications in best practices. It naturally supports Dependency Injection, Domain Driven Design and Layered Architecture. The sample application also implements validation, exception handling, localization and responsive design.

Wednesday, September 7, 2016

Scrum vs Waterfall / Project Manager

Scrum

  • Requirements are not fully known
  • Scrum master may not be a programming expert
  • Project Backlog (list of features/tasks)
  • Sprint Backlog (list of features done in this time period)


Glossarry

  • Estimating
  • Product Backlog
  • Prioritized product backlog
  • Product Owner
  • Release Backlog
  • Scrum Master - Project manager who knows nothing about programing and is not more skilled than team members.
  • Stories
  • Subject matter expert
  • Team member
  • User
  • Velocity

Waterfall

  • Sequential 
  • Complete Requirements
  • Complete Functional Spec / Prototype
  • Complete Design
  • Complete Schedule and Staff
  • Development / Test
  • Alpha sort of working 
  • Beta nearly complete
  • Release
Glossary

  • Project manager

Intro to Agile Scrum in Under 10 Minutes
What is Scrum? Agile Scrum in detail... by Rajamanickam

from: http://www.leanagiletraining.com/agile/waterfall-versus-scrum-how-do-they-compare
WATERFALL VERSUS SCRUM: HOW DO THEY COMPARE?
MARCH 24, 2012
I have recently been asked for advice on how to compare Waterfall (WF) and Scrum.  This is a hard question in some ways: the best way to compare will depend on the person you are talking to.  Another problem is that few people do ‘pure’ waterfall in actual practice. And the variations of Waterfall are many.

Still here are some thoughts that occur to me.  We think these statements often need explanation, but they can be useful as a start for a discussion, eg, ‘should we move from waterfall to Scrum?’

***

Scrum has a prioritized Product Backlog (mainly by Business Value), from which one could execute the Pareto Rule.
WF tends to assume the 100% – 100% rule.   And tends to order the building of the product mainly by technical dependencies or by what the geeks want to do first.

Scrum uses adaptive planning.
WF tries to keep to the initial plan.

Scrum gets feedback from working software early (first sprint, in 2 weeks) and often (every sprint).
WF does not have working software until very late in the whole dev cycle.

WF assumes we know ‘everything’ upfront.
Scrum assumes there is lots we don’t know (yet), and focuses on maximizing learning throughout the project.

WF tries to minimize change (a change control board for any requirements changes, for example).
Scrum tries to maximize the benefits of good change (eg, learning), and minimize the negative impact of bad change.

Scrum assumes change is normal, and anyway much of it can’t be controlled usefully.
WF assumes change is bad and can be controlled (usually).

WF puts most responsibility on the PM.
Scrum puts most responsibility on the small dedicated Team.
(WF uses a diffuse work group, with only the PM with clear overall responsibility.)

WF assumes the PM should plan the work.
Scrum assumes it is best if the Team plans its own work and re-plans.

WF prefers ‘planning from the center’ (e.g., by the PM).  And the workers just execute what they are given.
Scrum prefers more self-organization, and using the full ‘complex adaptive system’ (a tight thinking adaptive Team).

Scrum optimizes business value, time to market and quality.
WF optimizes conformance to schedule and budget.

WF’s typical problem is analysis paralysis and being late. Scrum addresses these.
People using Scrum often err in not thinking quite enough up-front….an easier problem to fix, we think.

When people do WF they typically are thinking: “If I just follow the process and the plan, all will be well.”
Scrum tries to force the Team to think for themselves, in their specific situation. Hence, it is a bare framework of things that are essential for every effort. Always other things, in addition to Scrum, must be done.

WF has weak controls (eg, conformance to schedule and budget).
Scrum has strong and frequent controls (e.g., did you all get all those features done this past 2 weeks?)…which enables faster improvement.

Notes:
Unprofessional people often say they are doing ‘Scrum.’  Above we are talking about vigorous professional Scrum, not ‘cowboy Scrum’ or ScrumButt.

Good people forced into WF typically use agile-scrum ideas to make it really work.  Above we are talking about ‘true’ Waterfall. While ‘true’ Waterfall rarely exists, we think that one can still see that the ideas and practices of Waterfall, as much as they remain in real practice, impede progress compared to Agile.

Final comment: These are not all the statements one could make.  There probably are other useful comparisons. Your feedback is very welcome.

Monday, August 8, 2016

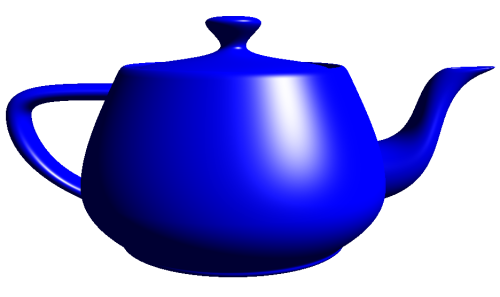
3D Graphics Teapot

3D Graphics Teapot


How to model a teapot
https://en.wikibooks.org/wiki/OpenGL_Programming/Modern_OpenGL_Tutorial_07
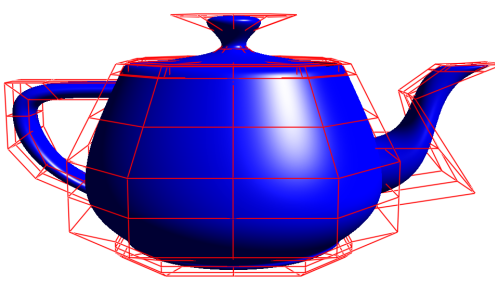
It's madeof 32 bezier patches and you can easily 

Code to do teapot in C++
Bézier Curves and Surfaces: the Utah Teapot
http://www.scratchapixel.com/lessons/advanced-rendering/bezier-curve-rendering-utah-teapot

find it if you google for "utah teapot" 

I have some old class code from fall 2001 that does teapots via Bezier 
patches: 
http://www.cs.unc.edu/~vogel/COMP236/program3/index.html 

Original teapot data

https://sjbaker.org/wiki/index.php?title=The_History_of_The_Teapot


The Teapot DataSet

NewellTeaset.jpg

"There is no spoon"
The teapot is made from nine patches - some reflected in two axes , others in one axis only. 
Rim:
  { 102, 103, 104, 105,   4,   5,   6,   7,
        8,   9,  10,  11,  12,  13,  14,  15 }
  Body:
    {  12,  13,  14,  15,  16,  17,  18,  19,
       20,  21,  22,  23,  24,  25,  26,  27 }
    {  24,  25,  26,  27,  29,  30,  31,  32,
       33,  34,  35,  36,  37,  38,  39,  40 }
  Lid:
    {  96,  96,  96,  96,  97,  98,  99, 100,
      101, 101, 101, 101,   0,   1,   2,   3 }
    {   0,   1,   2,   3, 106, 107, 108, 109,
      110, 111, 112, 113, 114, 115, 116, 117 }
  Handle:
    {  41,  42,  43,  44,  45,  46,  47,  48,
       49,  50,  51,  52,  53,  54,  55,  56 }
    {  53,  54,  55,  56,  57,  58,  59,  60,
       61,  62,  63,  64,  28,  65,  66,  67 }
  Spout:
    {  68,  69,  70,  71,  72,  73,  74,  75,
       76,  77,  78,  79,  80,  81,  82,  83 }
    {  80,  81,  82,  83,  84,  85,  86,  87,
       88,  89,  90,  91,  92,  93,  94,  95 }

  Vertices:

    {  0.2000,  0.0000, 2.70000 }, {  0.2000, -0.1120, 2.70000 },
    {  0.1120, -0.2000, 2.70000 }, {  0.0000, -0.2000, 2.70000 },
    {  1.3375,  0.0000, 2.53125 }, {  1.3375, -0.7490, 2.53125 },
    {  0.7490, -1.3375, 2.53125 }, {  0.0000, -1.3375, 2.53125 },
    {  1.4375,  0.0000, 2.53125 }, {  1.4375, -0.8050, 2.53125 },
    {  0.8050, -1.4375, 2.53125 }, {  0.0000, -1.4375, 2.53125 },
    {  1.5000,  0.0000, 2.40000 }, {  1.5000, -0.8400, 2.40000 },
    {  0.8400, -1.5000, 2.40000 }, {  0.0000, -1.5000, 2.40000 },
    {  1.7500,  0.0000, 1.87500 }, {  1.7500, -0.9800, 1.87500 },
    {  0.9800, -1.7500, 1.87500 }, {  0.0000, -1.7500, 1.87500 },
    {  2.0000,  0.0000, 1.35000 }, {  2.0000, -1.1200, 1.35000 },
    {  1.1200, -2.0000, 1.35000 }, {  0.0000, -2.0000, 1.35000 },
    {  2.0000,  0.0000, 0.90000 }, {  2.0000, -1.1200, 0.90000 },
    {  1.1200, -2.0000, 0.90000 }, {  0.0000, -2.0000, 0.90000 },
    { -2.0000,  0.0000, 0.90000 }, {  2.0000,  0.0000, 0.45000 },
    {  2.0000, -1.1200, 0.45000 }, {  1.1200, -2.0000, 0.45000 },
    {  0.0000, -2.0000, 0.45000 }, {  1.5000,  0.0000, 0.22500 },
    {  1.5000, -0.8400, 0.22500 }, {  0.8400, -1.5000, 0.22500 },
    {  0.0000, -1.5000, 0.22500 }, {  1.5000,  0.0000, 0.15000 },
    {  1.5000, -0.8400, 0.15000 }, {  0.8400, -1.5000, 0.15000 },
    {  0.0000, -1.5000, 0.15000 }, { -1.6000,  0.0000, 2.02500 },
    { -1.6000, -0.3000, 2.02500 }, { -1.5000, -0.3000, 2.25000 },
    { -1.5000,  0.0000, 2.25000 }, { -2.3000,  0.0000, 2.02500 },
    { -2.3000, -0.3000, 2.02500 }, { -2.5000, -0.3000, 2.25000 },
    { -2.5000,  0.0000, 2.25000 }, { -2.7000,  0.0000, 2.02500 },
    { -2.7000, -0.3000, 2.02500 }, { -3.0000, -0.3000, 2.25000 },
    { -3.0000,  0.0000, 2.25000 }, { -2.7000,  0.0000, 1.80000 },
    { -2.7000, -0.3000, 1.80000 }, { -3.0000, -0.3000, 1.80000 },
    { -3.0000,  0.0000, 1.80000 }, { -2.7000,  0.0000, 1.57500 },
    { -2.7000, -0.3000, 1.57500 }, { -3.0000, -0.3000, 1.35000 },
    { -3.0000,  0.0000, 1.35000 }, { -2.5000,  0.0000, 1.12500 },
    { -2.5000, -0.3000, 1.12500 }, { -2.6500, -0.3000, 0.93750 },
    { -2.6500,  0.0000, 0.93750 }, { -2.0000, -0.3000, 0.90000 },
    { -1.9000, -0.3000, 0.60000 }, { -1.9000,  0.0000, 0.60000 },
    {  1.7000,  0.0000, 1.42500 }, {  1.7000, -0.6600, 1.42500 },
    {  1.7000, -0.6600, 0.60000 }, {  1.7000,  0.0000, 0.60000 },
    {  2.6000,  0.0000, 1.42500 }, {  2.6000, -0.6600, 1.42500 },
    {  3.1000, -0.6600, 0.82500 }, {  3.1000,  0.0000, 0.82500 },
    {  2.3000,  0.0000, 2.10000 }, {  2.3000, -0.2500, 2.10000 },
    {  2.4000, -0.2500, 2.02500 }, {  2.4000,  0.0000, 2.02500 },
    {  2.7000,  0.0000, 2.40000 }, {  2.7000, -0.2500, 2.40000 },
    {  3.3000, -0.2500, 2.40000 }, {  3.3000,  0.0000, 2.40000 },
    {  2.8000,  0.0000, 2.47500 }, {  2.8000, -0.2500, 2.47500 },
    {  3.5250, -0.2500, 2.49375 }, {  3.5250,  0.0000, 2.49375 },
    {  2.9000,  0.0000, 2.47500 }, {  2.9000, -0.1500, 2.47500 },
    {  3.4500, -0.1500, 2.51250 }, {  3.4500,  0.0000, 2.51250 },
    {  2.8000,  0.0000, 2.40000 }, {  2.8000, -0.1500, 2.40000 },
    {  3.2000, -0.1500, 2.40000 }, {  3.2000,  0.0000, 2.40000 },
    {  0.0000,  0.0000, 3.15000 }, {  0.8000,  0.0000, 3.15000 },
    {  0.8000, -0.4500, 3.15000 }, {  0.4500, -0.8000, 3.15000 },
    {  0.0000, -0.8000, 3.15000 }, {  0.0000,  0.0000, 2.85000 },
    {  1.4000,  0.0000, 2.40000 }, {  1.4000, -0.7840, 2.40000 },
    {  0.7840, -1.4000, 2.40000 }, {  0.0000, -1.4000, 2.40000 },
    {  0.4000,  0.0000, 2.55000 }, {  0.4000, -0.2240, 2.55000 },
    {  0.2240, -0.4000, 2.55000 }, {  0.0000, -0.4000, 2.55000 },
    {  1.3000,  0.0000, 2.55000 }, {  1.3000, -0.7280, 2.55000 },
    {  0.7280, -1.3000, 2.55000 }, {  0.0000, -1.3000, 2.55000 },
    {  1.3000,  0.0000, 2.40000 }, {  1.3000, -0.7280, 2.40000 },
    {  0.7280, -1.3000, 2.40000 }, {  0.0000, -1.3000, 2.40000 },

As you can probably guess, the numbers in the patch array index into the vertex array.
If you look again at the photo of the real teapot, you can see that it's quite a bit taller than the classic computer teapot.

he original teapot data has no bottom. Some of the data sets that are out there (depressingly, this includes the one in the GLU and GLUT distributions) have added a bottom - but that is definitely 'impure'. Here is the data for the bottom:
  Bottom:
    { 118, 118, 118, 118, 124, 122, 119, 121,
      123, 126, 125, 120,  40,  39,  38,  37 }

  Vertices 118..126:
    {  0.0000,  0.0000, 0.00000 }, {  1.4250, -0.7980, 0.00000 },
    {  1.5000,  0.0000, 0.07500 }, {  1.4250,  0.0000, 0.00000 },
    {  0.7980, -1.4250, 0.00000 }, {  0.0000, -1.5000, 0.07500 },
    {  0.0000, -1.4250, 0.00000 }, {  1.5000, -0.8400, 0.07500 },
    {  0.8400, -1.5000, 0.07500 }

How to use timer for animation

http://stackoverflow.com/questions/24217988/using-android-timers-to-implement-graphical-movement

The most common approach I have seen is somewhat different. It's more typical to update the animation while preparing to render each frame, and base the update on the amount of time that has passed since the last frame.
Since distance is velocity multiplied by time, you do this by assigning a velocity vector to each of your objects. Then when it's time to update the animation, you take the time difference since the last update, and the increment you apply to your positions is the time difference multiplied by the velocity. The velocity is constant as long as you just use a linear motion, but can also change over time for more complex animations, e.g. due to gravity, collision with other objects, etc.
If you're using OpenGL on Android, you're probably using a GLSurfaceView for your rendering. By default, the GLSurfaceView will already invoke your rendering function continuously, up to 60 fps if your rendering can keep up with the display refresh rate.
What you roughly do is keep the time when the last frame was rendered as a member variable in your GLSurfaceView.Renderer implementation. Then each time onDraw() is called, you get the new time, and subtract the last frame time from this time to get the time increment. Then you store away the new time in your member variable, multiply the time increment by the velocity, and add the result to your positions.
After the positions are updated, you render your objects as you normally would.
To give you the outline, the following is a slightly adapted piece of (pseudo-)code I copied from my answer to a similar question (Android timing in OpenGL ES thread is not monotonic):
public void onDrawFrame(GL10 gl) {
    currentTime = SystemClock.elapsedRealtime()
    deltaTime = currentTime - lastFrameTime
    lastFrameTime = currentTime
    update animation based on deltaTime
    draw frame
}
Where lastFrameTime is a member variable, currentTime a local variable.
shareimprove this answer

Here is how one grad student renders a teapot:

http://vis.berkeley.edu/~joshea/projects/bezier/


The basic OpenGL functions for curves are (in C):

    glMap1f(target, u_min, u_max, stride, order, point_array); glEnable(target); glEvalCoord1f(u);
The first two are setup functions. The first, glMap1f(), is how we specify all the control information (points, colors, or whatever). The target is the kind of control information you are specifying and the kind of information you want generated, such as:
    GL_MAP1_VERTEX_3, a vertex in 3D GL_MAP1_VERTEX_4, a vertex in 4D (homogeneous coordinates GL_MAP1_COLOR_4, a RGBA color GL_MAP1_NORMAL, a normal vector GL_MAP1_TEXTURE_COORD_1, a texture coordinate. (We'll talk about textures in a few weeks.)
The u_min and u_max arguments are just the min and max paramater, so they are typically 0 and 1, though if you just want a piece out of the curve, you can use different values. For example, to get the middle fifth of the curve, you could give u_min=0.4 and u_max=0.6.

Open Source: OpenGL ES Curve Library For iOS


OpenGL ES does not have a built in library for curve generation, and while the formulas for creating curves can be readily found there are so many different types and it is always nice to have everything done for you. Core Animation provides a few different types of curves, but there are many more. I found out about some great open source code that performs the necessary calculations for 22 different types of curves.  In case you’re wondering why you might need this data — it is extremely useful for animation.  Also, this is not only an OpenGL curve library, you can use the functions for different Core Animation curves also.
The library is from Jeff Lamarche, co-author of Beginning iPhone 3 Developmentand More iPhone 3 Development books you can find out more about the functions, and see some of the examples of the curves at:
More Animation Curves Than You Can Shake A Stick At
Further information on how to use the functions can be found at the above link.

Tuesday, July 19, 2016

Android OpenGL Tutorials

Android OpenGL Tutorials

This is the official Google Android documentation
https://developer.android.com/training/graphics/opengl/index.html

pdf all about opengl es
http://www.pdfdrive.net/all-about-opengl-es-2-e560764.html

Anton tutorial $9.50 kindle book
https://www.amazon.com/Antons-OpenGL-Tutorials-Anton-Gerdelan-ebook/dp/B00LAMQYF2/ref=sr_1_1?s=books&ie=UTF8&qid=1470839771&sr=1-1&keywords=opengl


http://www.pdfdrive.net/opengl-es-302-april-8-2013-khronos-group-e10597635.html


https://software.intel.com/en-us/android/articles/porting-opengl-games-to-android-on-intel-atom-processors-part-2
The OpenGL ES 1.1 application programming interface (API) is a subset of the OpenGL 1.x APIs that have been used on desktop Linux* and Windows* systems for decades. Likewise, the OpenGL ES 2.0 API is a subset of the OpenGL 2.0 API from desktop systems. Therefore, any game porting project should start with an assessment of the OpenGL feature set that the game’s code uses to determine the age of the code and identify the parts that you must rewrite because of differences between the OpenGL version used and the OpenGL ES version targeted on Android.
The major differences between OpenGL 2.0 and OpenGL ES 2.0 fall into three main categories: geometry specification, geometry transformation, and changes in the OpenGL Shading Language (GLSL). OpenGL 2.0 offers four ways to specify geometry: immediate mode, display lists, vertex arrays, and vertex buffer objects. OpenGL ES 2.0 does not support immediate mode (glBegin and glEnd blocks) or display lists, so you must specify geometry with either vertex arrays or vertex buffer objects.
OpenGL 2.0 has functions for loading the model view, projection, and texture matrices plus some convenience functions for combining these matrices, such aglTranslateglRotate, and glScale. OpenGL ES 2.0 has neither these functions nor any of the lighting-related functions because the fixed-function pipeline has been replaced with the shader programming model. For OpenGL ES 2.0, matrix and lighting calculations should be made in the vertex shader.
The shader language for OpenGL ES 2.0 (GLSL ES) is also a subset of the shader language for desktop OpenGL 2.0 (GLSL). One major difference is that GLSL has built-in variables to access states in the fixed-function pipeline in the vertex shader (such as gl_ModelViewMatrix). Because OpenGL ES 2.0 does not support the fixed-function pipeline, these variables are not supported in GLSL ES.
The following OpenGL 2.0 features are lacking in OpenGL ES 2.0:
  • Immediate mode geometry specification
  • Display list geometry specification
  • All fixed-function pipeline processing
  • Fixed transformation and lighting
  • Matrix stack and matrix transformations
  • User clip planes
  • Line and polygon smoothing and stipple
  • Pixel rectangles and bitmaps
  • One-dimensional textures and some texture wrap modes
  • Occlusion queries
  • Fog

The GLU Library

Desktop versions of OpenGL typically provide a library of convenience functions called the OpenGL Utility Library. The GLU consists of functions that are not strictly part of OpenGL or essential for using OpenGL but are helpful when coding 3D applications for OpenGL. A typical GLU library includes functions for constructing model-view and projection matrices, performing general matrix calculations, computing quadric surfaces, tessellating polygons, generating mipmaps, and reporting error messages. Most games on desktop OpenGL use some GLU functions, which can be a problem because Android provides only a minimal implementation of GLU that is available only from the SDK. These classes are listed in Table 2.
Table 2. Summary of Android Classes That Provide GLU Functionality
ClassFunctionality
android.opengl.GLUCreating projection matrices for OpenGL ES
android.graphics.MatrixCreating model–view and general matrices
OpenGL ES 1.1 and 2.0 provide support for generating mipmaps, so the missing functionality is computing quadric surfaces and support for tessellating polygons. If you need these functions, other open source implementations of GLU exist that are more complete and suitable for use with the Android NDK—for example, GLU ES.


GLU 1.3 port for OpenGL ES 1.0 (CM) and above

GLU ES

GLU 1.3 partitial port (libutil and libtess components only) for OpenGL ES 1.x (CM - Common profile) and above. This port supports:

  • Quadrics: gluNewQuadric(), gluDeleteQuadric(), gluQuadricCallback(), gluQuadricNormals(), gluQuadricTexture(), gluQuadricOrientation(), gluQuadricDrawStyle(), gluCylinder(), gluDisk(), gluPartialDisk(), gluSphere().
  • Registry: gluGetString(), gluCheckExtension(), gluErrorString().
  • Projection matrix manipulation: gluOrtho2D(), gluPerspective(), gluLookAt(), gluProject(), gluUnProject(), gluUnProject4(), gluPickMatrix().
  • 2D Mipmaps: gluScaleImage(), gluBuild2DMipmapLevels(), gluBuild2DMipmaps().
  • Tesselation: gluBeginPolygon(), gluDeleteTess(), gluEndPolygon(), gluGetTessProperty(), gluNewTess(), gluNextContour(), gluTessBeginContour(), gluTessBeginPolygon(), gluTessCallback(), gluTessEndContour(), gluTessEndPolygon(), gluTessNormal(), gluTessProperty(), gluTessVertex().
https://maniacdev.com/2009/12/iphone-opengles-animation-tutorial
Here’s some other OpenGL ES Tutorials, and my list of iPhone OpenGL ES resources.

https://maniacdev.com/2009/04/converting-opengl-code-to-iphone-opengl-es
One of the major problems I found was that the Glu library is missing in OpenGL ES, fortunately Michael Gorchak has begun work on a GluES librarywhich includes much of the missing funcitonality also in the Cocos2D frameworkyou can find implementations of gluLookAt and gluPerspective functions in the Glu module.


http://www.cs.utah.edu/gdc/projects/alpha1/help/man/html/model_repo/model_teapot/model_teapot.html
Teapot Subdivision byRuss Fish (standing Martin Newell's and Hank Driskill's shoulders)
The original model was passed from researcher to researcher for many years, since design systems that produced good curved surface models were extremely rare in those days, and it made a good benchmark for rendering methods. Frank Crow posted the original Teapot Bezier patch control points to the Net, perhaps sometime around 1986.

The original teapot model had a few problems:  It was very visibly NOT a solid model.

Minor visible parts were left out. There was no bottom to the teapot, nor a rim for the lid to rest on. You could see in through the bottom, or past the edge of the lid, to see that there was no inside, either.

The intersection between the spout and the body of the teapot was left implicit. The spout was modeled to simply penetrate through the body surface, so the hidden-surface portion of the image rendering method covered up the portion of the spout which was inside the body.

It was not round. It was pretty close (within 1% or so), so perhaps this is a quibble. A wheel-thrown teapot would be round, but a moulded teapot like the real one of Martin's which the model represents need not be round. However, the very slightly four-lobed cross-sectional shape of the teapot was as close as a cubic Bezier curve could come to representing a circular cross section, reflecting the inability of non-rational Bezier curves to represent conic sections such as circles.

In 1992, Hank Driskill got the idea to make a modern trimmed-NURBS solid model of the Utah Teapot. This was featured (with the addition of warp nacelles) on his SigGraph Tee-Shirt Contest winning "Utah, the Next Generation" tee-shirts.

http://cs.lmu.edu/~ray/notes/openglexamples/

https://www3.ntu.edu.sg/home/ehchua/programming/android/Android_3D.html

https://www.khronos.org/assets/uploads/books/openglr_es_20_programming_guide_sample.pdf

Transformations in OpenGL Transformations in OpenGL

https://www.cs.cmu.edu/afs/cs/.../lec03a.pdf

Carnegie Mellon University
Some sample code. Display(){ … glMatrixMode(GL_MODELVIEW);. glLoadIdentity();. glTranslatef(0.0, 0.0, -6.0);. glRotatef(45.0, 0.0, 0.0);. glScalef(2.0, 2.0, 2.0);.

CUNY

In this document Create an Activity with GLSurfaceView Draw a Shape on GLSurfaceView Define a Triangle Draw the Triangle Apply Projection and Camera Views Add Motion Respond to Touch Events Related Samples API Demos - graphics OpenGL ES 1.0 Sample TouchRotateActivity See also 3D with OpenGL OpenGL ES 2.0 Tutorials: O


http://www.programforandroid.com/android-programming-tutorials/opengl-es-2-0/

OpenGL ES 2.0


This tutorial shows you how to create a simple Android application that uses the OpenGL ES 2.0 API to perform some basic graphics operations. You’ll learn how to:
  • Create an activity using GLSurfaceView and GLSurfaceView.Renderer
  • Create and draw a graphic object
  • Define a projection to correct for screen geometry
  • Define a camera view
  • Rotate a graphic object
  • Make graphics touch interactive
The Android framework supports both the OpenGL ES 1.0/1.1 and OpenGL ES 2.0 APIs. You should carefully consider which version of the OpenGL ES API (1.0/1.1 or 2.0) is most appropriate for your needs. For more information, see Choosing an OpenGL API Version. If you would prefer to use OpenGL ES 1.0, see the OpenGL ES 1.0 tutorial.
Before you start, you should understand how to create a basic Android application. If you do not know how to create an app, follow the Hello World Tutorial to familiarize yourself with the process.
Caution: OpenGL ES 2.0 is currently not supported by the Android Emulator. You must have a physical test device running Android 2.2 (API Level 8) or higher in order to run and test the example code in this tutorial.